Project Target Migration
Guide to migrating SCI-Compiler projects between different target hardware platforms. Includes compatibility matrix, migration procedures, and platform-specific considerations for DT1260, R5560, DT5560, DT5550, X274X, and V2495 boards.
Overview
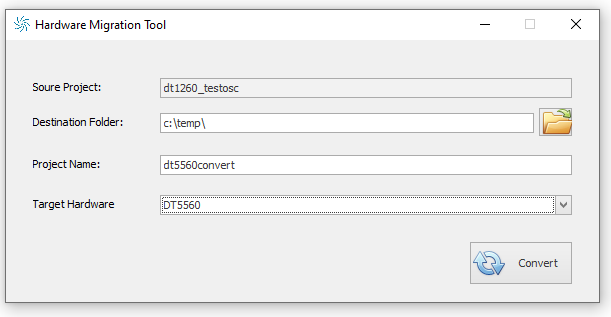
SCI-Compiler provides a Hardware Migration Tool that enables users to convert projects from one target board to another. This tool preserves the design logic while adapting board-specific configurations, I/O mappings, and IP blocks to the new target platform.
The migration tool is accessible through the Home toolbar in the Project group, via the Migrate Hardware button.
Migration Compatibility Matrix
The following table shows migration compatibility between different board families. Three levels of compatibility are indicated:
| Legend | Meaning |
|---|---|
|
Safe Migration - Project can be migrated with minor review. Most components compatible. |
|
Review Required - Migration possible but requires manual design review and adjustments. |
|
Limited Support - Major functionalities not supported. Significant redesign required. |



Compatibility Table
| Source → Target | DT1260 | R5560 | R5560SE | DT5560 | DT5550 | DT5550CIT | DT5560PET | X274X | V2495 |
|---|---|---|---|---|---|---|---|---|---|
| DT1260 | — |
|
|
|
|
|
|
|
|
| R5560 |
|
— |
|
|
|
|
|
|
|
| R5560SE |
|
|
— |
|
|
|
|
|
|
| DT5560 |
|
|
|
— |
|
|
|
|
|
| DT5550 |
|
|
|
|
— |
|
|
|
|
| DT5550CIT |
|
|
|
|
|
— |
|
|
|
| DT5560PET |
|
|
|
|
|
|
— |
|
|
| X274X |
|
|
|
|
|
|
|
— |
|
| V2495 |
|
|
|
|
|
|
|
|
— |
Migration Procedure
Using the Migration Tool
-
Open the Source Project
- Open the project you want to migrate in SCI-Compiler
-
Launch Migration Tool
- Click the Migrate Hardware button in the Project group of the Home toolbar
- The Hardware Migration Tool dialog will appear
-
Configure Migration Settings
- Source Project: Automatically filled with the current project path
- Destination Folder: Select the destination folder for the migrated project
- Project Name: Enter a name for the migrated project
- Target Hardware: Select the target board from the dropdown menu
-
Execute Migration
- Click the Convert button
- SCI-Compiler will create a new project with adapted configurations
-
Review and Validate
- Open the migrated project
- Review all component configurations
- Check I/O mappings and pin assignments
- Verify memory-mapped component addresses
- Test compilation
Platform-Specific Considerations
Analog Input Channels
When migrating between boards with different analog capabilities:
-
DT1260/R5560/DT5560 → DT5550: The DT5550 family has 4 analog input channels compared to 8 channels on DT1260/R5560/DT5560. Projects using channels 4-7 require redesign or channel reassignment.
-
Review Required: Check all AFE (Analog Front End) component configurations and update channel mappings accordingly.
Digital I/O Differences
- DT1260/R5560/R5560SE/DT5560: Use LEMO connectors for digital I/O
- DT5550/DT5550CIT: Use MCX connectors for digital I/O
- DT5560PET: Has PET-specific I/O configuration
When migrating between these families, verify that:
- Connector types match your cabling requirements
- Signal levels are compatible
- Timing constraints are maintained
FPGA and Vendor Differences
Critical considerations when migrating between different FPGA vendors:
Xilinx to Intel (or vice versa)
-
IP Block Compatibility: Xilinx-specific IP blocks (e.g., Xilinx Clock Wizard, Xilinx Block RAM) cannot be directly migrated to Intel (Altera) platforms
-
V2495 (Intel Cyclone V): Requires replacement of all Xilinx IP with Intel equivalents
-
Required Actions:
- Remove all vendor-specific IP blocks from the design
- Replace with equivalent IP from the target vendor’s library
- Reconfigure clocking resources (PLLs, clock managers)
- Update memory blocks (Block RAM → M10K/M20K)
- Verify timing constraints in the new toolchain
X274X to Other Platforms
The Caen X274X family has unique architectural differences that make migration challenging:
-
Limited Component Support: Many standard SCI-Compiler components may not be available or may require significant modifications
-
Custom IP Requirements: X274X-specific IP blocks need complete replacement
-
Recommended Approach: Consider the migration as a redesign rather than a direct conversion. Use the original project as a reference and rebuild the logic for the target platform.
Post-Migration Checklist
After completing a hardware migration, perform these validation steps:
1. Component Review
- Verify all components are supported on the target platform
- Check that component parameters are within valid ranges
- Confirm memory-mapped components have valid address assignments
- Review RegisterFile.json for address conflicts
2. I/O Configuration
- Validate pin assignments in Board Configuration
- Check signal directions (input/output)
- Verify unused pins are properly terminated
- Confirm connector types match physical hardware
3. Clock and Timing
- Review clock domain configurations
- Check PLL/clock manager settings
- Verify timing constraints are met
- Confirm sample rates are achievable on new hardware
4. Memory and Addressing
- Check MMC address space allocation
- Verify endpoint configurations
- Confirm no address overlaps
- Test register read/write operations
5. Compilation and Testing
- Perform full firmware compilation
- Review synthesis reports for warnings
- Check resource utilization
- Program FPGA and validate functionality
- Test all I/O channels
- Verify SciSDK communication
Migration Best Practices
Before Migration
-
Backup Original Project: Always keep a copy of the original working project
-
Document Custom Configurations: Note any special settings, custom IP, or unique design elements
-
Check Compatibility: Review the compatibility matrix before starting
-
Plan for IP Replacement: Identify vendor-specific IP that will need replacement
During Migration
-
Use Descriptive Names: Give the migrated project a clear, descriptive name indicating the target platform
-
Incremental Validation: Test components individually after migration rather than waiting until the end
-
Document Changes: Keep notes on what required manual adjustment
After Migration
-
Functional Testing: Test all features that worked in the original design
-
Performance Validation: Verify that timing and performance metrics are maintained
-
Update Documentation: Update project documentation to reflect the new target platform
Troubleshooting Migration Issues
Compilation Errors After Migration
Symptom: Project compiles on original platform but fails on new platform
Possible Causes:
- Vendor-specific IP blocks not replaced
- Resource utilization exceeds target FPGA capacity
- Timing constraints not met on new platform
Solutions:
- Check compilation log for specific errors
- Replace any vendor-specific IP
- Review and adjust timing constraints
- Consider reducing clock frequencies if timing closure fails
Address Conflicts
Symptom: RegisterFile shows overlapping address ranges
Possible Causes:
- Different memory map organization on target platform
- New platform has different base addresses
Solutions:
- Open RegisterFile.json
- Review all MMC addresses
- Manually reassign conflicting addresses
- Recompile and verify
Missing I/O Pins
Symptom: Board configuration shows missing or unavailable pins
Possible Causes:
- Target board has different I/O configuration
- Pin count mismatch between platforms
Solutions:
- Review target board pinout in Board Configuration
- Reassign signals to available pins
- Update cable connections to match new pinout
Related Documentation
- Board Configuration - Configure I/O pins and connections
- Memory Mapped Components - Understanding address mapping
- Firmware Compilation - Compiling for different platforms
- FPGA Programming - Programming different target boards